Friday, September 04, 2009

One Last Post for the Day

Today's my Big Baby Brother's 34th Birthday!  Happy Bday Dude!

He used to be really cute.   

The family's still not sure what happened to change that.

Contest Results

Times Up!  Put down your pencils, um wait, you're not being tested are you?  The contest results are in.  This time around, the contest was not too popular.  No one cares if my Boy Scouts have fun or not.  Except for the four people that left me some suggestions.  To those four I say, "THANK YOU, THANK YOU, THANK YOU!"  I will indeed be incorporating a bunch of your suggestions. 


I used the Random Number Generator and got the following number:

 
Please excuse the weird "a" in there.  It seems my cropping "skillz" are not in abundance today either.  Anyway, the winner is:
SAMMIE!
Congratulations Sammie!  As soon as I get your address and as soon as the Labor Day Holiday is over and the mail is running again, I'll have your yarn and pendant out to you asap!

Asymetrical Necklace

Jewelry mania has really bitten me this week.  This was today's endeavor: 

Click to enlarge!

It's worn asymetricaly.  I had a devil of a time getting a photo of this.  If it was laying down, it didn't show it off well and then when I was wearing it, most of the pics came out all grainy.  But I figure these two pics are enough for you to get the point. 


Click to enlarge!
This was a fun piece to create.  My problem solving "skillz" seem to be a bit lacking though.  It took far longer to put together than it should have. 

The black cord is a silk cord, and the silver is silver plated chain.  Almost all of the materials used in this project were purchased at Hobby Lobby.  The two faceted beads came off of another bracelet that I deconstructed.  The chain connector that connects the pendant and the chains, not sure the official term on that part, is vintage from a necklace that was my grandmother's.

I love this!  Not sure what I'll wear it with, but I love it!

Thursday, September 03, 2009

Counter Top Follow Up

Several people have asked where to get the Envirotex Lite and the cost.  If you are just looking for a small amount, you can check out places like Michael's.  At my local Michael's, they were carrying this product only in the 8 oz sizes at $11.99.   This size only covers about 2 square feet.  That's not enough to do the job on my huge kitchen.  Just one counter in my kitchen is 10 sq. feet.  I don't think they carry enough in stock to do what I need to do.  Another Michael's may carry larger sizes.  If they do, that's where your Michael's coupon will really come in handy.

However, You can go to the www.creative-wholesale.com website and they carry the product in the gallon sizes for $58.99.  There's also a product called EX74 that is basically the same product but has a UV filter in it to prevent yellowing, which would be really great for a sunny kitchen.  It also has more "open time" which gives you a little more leeway in spreading and getting rid of the bubbles.  Instead of 25 minutes of working time with the Envirotex Lite, you get an hour's worth of working time. You can get a 2 gallon kit of the EX74 for $105.83. 

Basically, for me it's a size and ease of use issue.  I'll probably be going with the EX74 to complete the rest of the project.  Of course, your mileage and product may vary.

As always, remember to follow the directions completely and keep safety a priority when using these products!  Wear gloves, no open flames, lots of ventilation, etc. etc. etc.

Wednesday, September 02, 2009

New Bracelet Up in Etsy Shop


New Earth, Sea and Grass Bracelet up in my etsy shop!

Tuesday, September 01, 2009

Rugs & Sweaters

Since I've been on a home decorating kick lately, I thought I'd throw out a question to all of you.  I need to find a 8 x 10' rug for my living room.  It needs to be $400 or less.  Remember the tight budget?  We've got some tax money coming back (finally) and I'm allocating some of it for a rug.   

I had a 5 x 7' rug in our living room to cover a big black spot on the floor, but it's now going to the curb.  The black spot appeared about 4.5 years ago while we were on vacation.  Evidently one or three of our zoo (3 dogs, 2 indoor kitties) decided it would be a good idea to "go" on the floor while we were gone and the house sitter wasn't there.  The sitter didn't know anything had happened.   When we got back, the damage was done.  We did the best we could to fix it barring having someone come professionally sand and strip the floors and replace the boards.  Until we can get the money to fix all of the floor problems, I need a rug. 

Anyone got any good ideas on where to look for inexpensive large rugs? 
*****
Knitting news:  The green sweater has been frogged.  For some reason, every time I've tried to knit with green, I pick a pattern, frog it and then make something that I like.  I'm hoping that when I pick a new pattern for it, things will work out.  Until then, I've begun a new project:
 
This is the Quidditch Sweater by Anne Bergeron from the book Charmed Knits.  The Eldest has been begging for it.  I figured I'd better make it for him since the last thing I knit for him was a pair of socks about three years ago.  I better indulge him now before he hits his teen years and refuses to wear anything that I make him.
*****
 Don't forget the Contest which ends September 4th!
 

Monday, August 31, 2009

New Countertop! Sorta

Wait until you see this! As most of you know, I've spent the past year doing a kitchen renovation. That would be with a capital "I" by the way. As in "I" am doing a kitchen renovation pretty much by myself. This is what has lead to the project taking an entire year.

First, there was the three, yes three, layers of wall paper to be dealt with. The bottom third layer had no primer underneath so I had to leave it on the walls. I primered over it twice before painting the pumpkin color that is on there now.

Second, the cabinets, that are still not finished. I'm getting there, I promise. My dad came and put wood trim on the cabinet and door fronts. You'll see that in just a sec. I finished painting two set of cabinets and have yet to do the third. You guys, this is a huge kitchen!

Third, and this is what today's post is about, is the countertops. We have been living with the most horrible blue laminate countertops. I cringe when I look at them. I've been abusing them so badly, cutting on them, putting really hot stuff on them and it's made no difference. They're still there. Or, at least, they sort of are.

See, we have an extremely tight budget with no room for budgets or errors. Go ahead and read that as we're almost broke. Go ahead, I don't mind. Being broke is not such a bad thing sometimes, it leads to more creativity. And boy, did we have it in Spades this weekend. Yeah, you read that right, I said "WE". My Mom was the lovely assistant on this project. Thanks to a post over on Craftster, I got inspired.

Here's where we started:
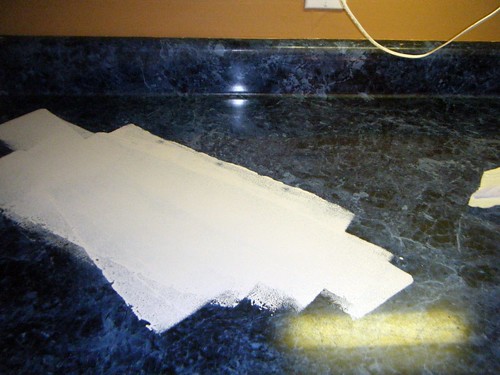

Notice the hideous blue on the countertop. I almost forgot to do the before pic. I remembered after I started the base coat.

For the base coat, we used the same paint that I'm putting on the cabinets, a biscuit color. Once this dried, we began applying paints using about six different natural sea sponges. The paints were all acrylic craft paints, seen here:


Here's my lovely assistant slaving working away:
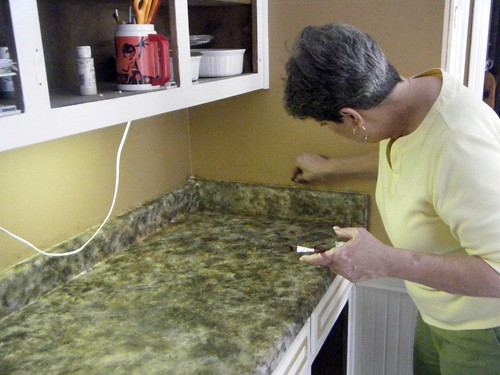

The next step, once everything was dry and the Youngest was in bed (around 8pm) we started the cool part. We applied resin. Specifically, Envirotex Lite. I had used this resin before when making study boards. Those were so cool, but I'll have to tell ya about those at another time. Anyway, there's very little time or room for error when using this product. Once mixed, you have 25 minutes to get it the way you want it before it begins to harden.

I only did one countertop this weekend. I wanted to make sure it was going to work before moving on to all of them. This section was 9.66 square feet not including the back splash. I have three more countertops to go, two small ones and one that is about 20 square feet. I figured if the project didn't work, I would just rip it out and buy more laminate which would cost around $1100 dollars if someone else installed it. Installing laminate is not my thing.

Here's how it turned out:


Oh, and just to show you how good we really are, (I'm not bashful am I?) here's a laminate sample that we used as an example that had all the colors that I was going for:
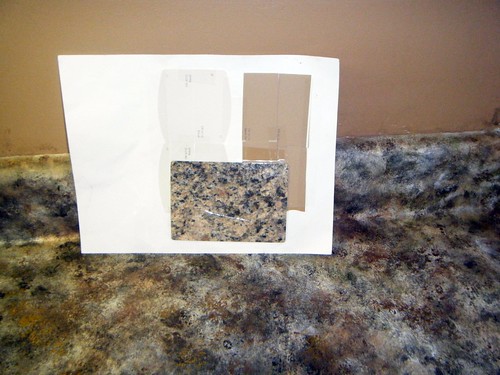
Not bad huh?


I'm so incredibly proud of this project.

We only did one coat of resin. I have one or two more coats to pour on and give it a little more strength.

When all is said and done, we will have saved about $800.00 dollars on this diy countertop project. What do ya think? Doesn't look like laminate now, does it?


ETA the Legalese:  Please if you try this make sure you do it safely!   Resin can be toxic if handled improperly.  Use gloves to minimize skin contact and do this in a well ventilated area.  Also, the directions tell you that you can use a torch to help get rid of the bubbles.  If you do this, and I didn't because I chickened out, please follow the directions to the letter! Carbon dioxide is what makes them release.  I used a straw to blow on the bubbles to release them.  I didn't want my house to burn down in the middle of my craft project.